SiteGround is a very promising web hosting provider. They’re offering a wide range of web hosting plans for different needs. In this article, we’re reviewing the exact steps to point a domain name to SiteGround hosting.
You will use cPanel tools to administer your website using web hosts such as SiteGround. This brief guide illustrates how to point domain name to SiteGround hosting and start using your new domain name on your SiteGround hosting account.
It’s also important to know that some of the SiteGround hosting plans allow you to host multiple domain names. This means that you don’t have to buy a separate web hosting account for each domain you have. This is called “hosting multiple addon domains”.
- Which SiteGround Shared Hosting Plans To Choose?
- SiteGround Server Locations: Where Are Data Centers?
Let’s get started pointing your domain name to the SiteGround hosting. All you need at this point are as follows:
- Login credentials to SiteGround hosting.
- Login credentials to Domain Registrar.
- Finding your SiteGround Nameservers.
Once you’re ready with these requirements above, we can get the tutorial started right away. This tutorial is for you only if you’ve purchased your domain name from another provider such as; NameCheap, GoDaddy, NameSilo, ..etc. If you’ve purchased your domain name from SiteGround, you won’t need to follow the steps here.
How To Point My Domain To SiteGround?
Let’s say you’ve already purchased your new web hosting account from SiteGround. And you’ve already got your domain name elsewhere. At this point, you want to connect the domain name to your web hosting account.
Honestly, this is what I usually recommend; purchasing the web hosting and domain name from two separate providers. This will keep you on the safe side in case anything went wrong. While the DNS pointing process is a task by itself, it’s to be done once and you’ll be very good to go.
The biggest domain name registrar is potentially GoDaddy. In fact, the organization provides web hosting facilities. On the other side, SiteGround’s hosting services are especially common. It takes other registrars, like GoDaddy, to accept domain names.
Alternatively, you may purchase your domain name from other providers such as; NameCheap or NameSilo. Actually, I’ve been using NameSilo for quite a long time now. And I’m very happy and satisfied with the service quality, their pricing, and support.
Finding SiteGround Nameservers
A name server is used every time anyone accesses a website, however often people don’t even realize what it is. You would have to remember what occurs when a website is accessed to grasp this definition.
What name servers do and using this knowledge to convert domain names into IP addresses – knowing the language of our machines. This cycle operates so efficiently that it is barely visible. You just type in a URL, let your user know where the website is located and launch the requested tab.
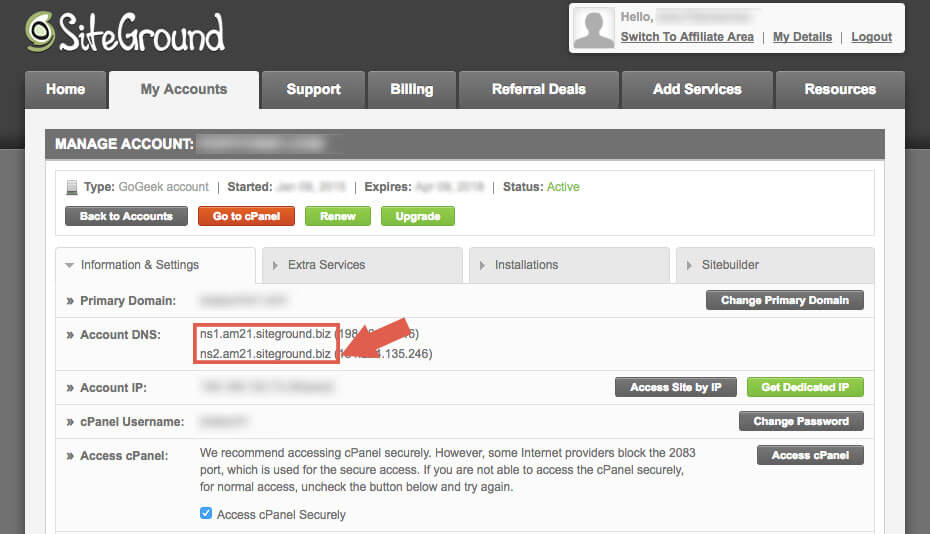
To change domain settings, you need to access the SiteGround Control Panel. Log in and click on the ‘Manage account’ tab. You’ll notice Siteground’s nameservers here. Copy name servers. Copy name servers. It’s going to look like this.
According to the nameserver settings you can even consider the corresponding IP addresses (Internet Protocol). You will just need to copy these nameservers as we will definitely use them on the domain registrar control panel later on in this tutorial.
Point Domain to SiteGround
After getting the SiteGround Nameservers, you will need to add these records to your domain name into the domain registrar. These nameservers simply tell the domain to redirect users to this particular web hosting account where my website actually is.
Now, you will need to follow the steps below based on which provider you’ve used to register your domain. I’ve compiled different steps below for different domain registrars; GoDaddy, NameCheap, NameSilo, and Google Domains.
Follow the corresponding steps and let’s get this started. It shouldn’t take more than a few seconds…
Point GoDaddy Domain to SiteGround

It’s pretty easy and straight-forward to point GoDaddy domain to SiteGround. You’ll just need to follow the steps below and you should be done. You’ll first need to login to your GoDaddy account and follow the steps below:
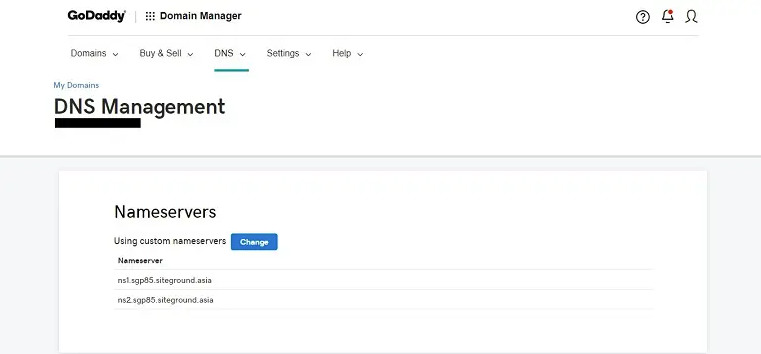
- Log in to GoDaddy Dashboard.
- Under “My Account“, click on “My Products“.
- In front of the Domain Name, click on “DNS“.
- In “DNS Management” page, click on “Change“.
- Paste “SiteGround Nameservers” and click “Save”.
Once completed, it will take anywhere from 2 hours and up to 48 hours for a complete DNS propagation. After that, you should be able to access your domain and it will be automatically connected to your SiteGround web hosting account.
Congratulations, you’re now ready to start building your upcoming awesome website.
Point NameCheap Domain to SiteGround
NameCheap is an awesome domain registrar. While it offers great web hosting services, NameCheap has been well-known for its incredible domain registration service. Furthermore, their pricing is pretty amazing competitively.
If you’ve purchased your domain name from NameCheap, then you will need to connect it to SiteGround Nameservers. The steps are pretty easy and straight-forward. You will kindly need to follow the steps below and you should be very ready to go.
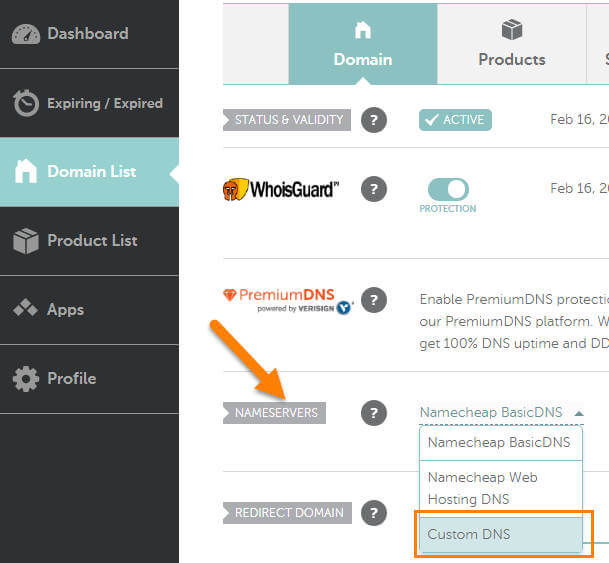
- Login to NameCheap Dashboard.
- On Sidebar, click on “Domains List“.
- Choose the domain name & click “Manage“.
- On the “Nameservers” section, click the dropdown list.
- From the options, click on “Custom DNS“.
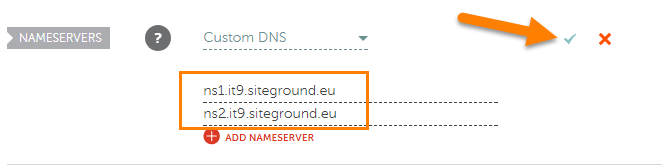
- Paste “SiteGround Nameservers” and click “Save”.
Once completed, it will take anywhere from 2 hours and up to 48 hours for a complete DNS propagation. After that, you should be able to access your domain and it will be automatically connected to your SiteGround web hosting account.
Congratulations, you’re now ready to start building your upcoming awesome website.
Point Google Domain to SiteGround
Google has recently become a domain registrar which helps you to manage domains at a fairly low cost with several specific forms and extensions. You may use a domain registered through Google Domains, but you must either point A record to a server or move the name servers to SiteGround hosting.

The following guide shows how to point Google domain to SiteGround hosting using the nameservers. You’ll just need to follow the steps below and you should be done. You’ll first need to login to your Google Domains account and follow the steps below:
- Login to your Google Domains.
- Select Domain and click “Configure DNS“.
- Check “Use Custom Nameservers“.
- Click “Add” to use two fields for nameservers.
- Paste “SiteGround Nameservers” and click “Save”.
Once completed, it will take anywhere from 2 hours and up to 48 hours for a complete DNS propagation. After that, you should be able to access your domain and it will be automatically connected to your SiteGround web hosting account.
Can I Point Wix Domain to SiteGround?
Yes, this is very possible. You can keep your domain name registered and maintained on the Wix platform while pointing it to another web host. While this is not the ultimate approach, this is very possible and easy to be done.
Before getting started, contact your web hosting provider and ask for the DNS records such as (A record, or CNAME record) to signify the domain. Be sure that you let your current website host realize that you need to refer to your domain without modifying your name servers.
Wix doesn’t allow you to use nameservers to point domain names externally. You can do that using other DNS records but not Nameservers. If nameservers are the only way to point your domain name, you will have to transfer your domain name away from Wix.
DNS Propagation
‘DNS Propagation’ is a phrase used to define the time period that the domain name shifts. Whenever you use a domain name, the DNS information is stored in the cache on the device. That can be the online cache on the operating system of the device, the Internet service provider’s DNS cache, etc.
DNS records are kept in cache mainly for better DNS query efficiency. — DNS record has a Time to Live (TTL) value and should be maintained by DNS servers in the cache. And if a record is modified, DNS servers tend to operate for their structured cache interest until this period is finished.
This is the core of DNS dissemination – it is time to refresh the stored details for a domain name on DNS servers around the globe. It is affected by the TTL of DNS data, which may have modified, but certain influences may also occur.
A shift in DNS needs up to 72 hours to occur internationally, but that occurs more frequently over a couple of hours. Just relax, the answer! It takes a while and sometimes 48 hours to pass domain names.
When you have built the WordPress installation, enter the login information you provided. When it is over and dusted, click on ‘Save’ to finalize it the domain updates. The adjustments made would not be checked if you quit without saving.
Conclusion
Your domain will function perfectly on SiteGround after completing the last stage. It takes up to 4 hours for Nameserver propagation. However, make the changes effective for up to 48 hours. Many modifications can take longer, but they may inevitably spread.
Once completed, you shall be able to start building your new website. Let us know in the comments section below if you require any further assistance. And don’t forget to share this awesome article with everyone on social media.
