I have bought domain name now what! I see what you’re saying. In this guide, I will share with you the important things you need to do after purchasing a domain name. Our target here is to have a fully functioning website.
First, I would like to congratulate you on having a domain name. You’re just one step closer to have an awesome business exposure. While you still need to do other things to get a website done, It all starts with purchasing a domain name.
You may think that hiring a professional freelancer is what you need to do. But I want to assure you that you can do it yourself following the steps below. And I guarantee; No technical skills required at all.
Let’s get your website online. All you need to do is to follow the steps below after buying a domain name. I made sure to be as specific and detailed as possible for you.
Never be anxious at all if you have no prior experience with all this technical stuff. You definitely can jump-start your awesome website with zero prior knowledge. This article offers you a detailed picture of all the technological aspects and measures to be focused next to your domain.
Let’s explore first and foremost the meaning of a domain name. The purchasing of a domain gives you a specific address on the internet. This address enables other users on the internet to reach your website. Your domain name is literally a strong window to build popularity for your own brand.
Having a website is a strong marketing technique. Basically, your website is your online presence and your identity on the internet. It’s one of the best ways for you to manage your business online. In this article, you will see how your business chances using a domain name.
1. Get a Web Hosting Package:
If you are new to this blogging industry, you might not know which hosting you should use to create your blog. Let me then recommend you to host your blog, I would recommend lots of free web hosting, but I already know that hosting is not worth it and will slow you down.
Thus, I’m recommending you to get a decent web hosting from BlueHost. The hosting plan is where you will host your site folders, images & databases. it’s like a small computer space dedicated to your website files. This computer will make your site accessible through the World Wide Web (WWW).
A domain name needs to be synced with a web hosting space to serve your website. Both are essentials working together. If you have not yet purchased a domain name, I would recommend using GoDaddy or NameCheap.
My ultimate suggestion is to never get the hosting and domain from the same provider. It’s always better to diversify your assets. Furthermore, I will never suggest you to buy hosting from a domain provider.
I have bought domain name now what! I got hosting already. If this is your case, then you can skip steps 1 and 2.
When it comes to web hosting, My top recommendation is WPXHosting, However; It could be a bit expensive for beginners. But yeah, here are 3 recommended web hosting providers for you:
- BlueHost – Starting at $2.95/mo.
- HostGator – Starting at $2.78/mo.
- GreenGeeks – Starting at $3.95/mo.
I’ve been using BlueHost & HostGator for so long time and I’m totally happy with their services. While being owned and operated by the same company EIG, Each one works in a whole different way. GreenGeeks is one of the best EIG alternatives which I strongly recommend.
It won’t take more than a few minutes. It’s super easy to sign up for BlueHost Web Hosting account. Just make sure you’re following the steps below and you will get it done right.
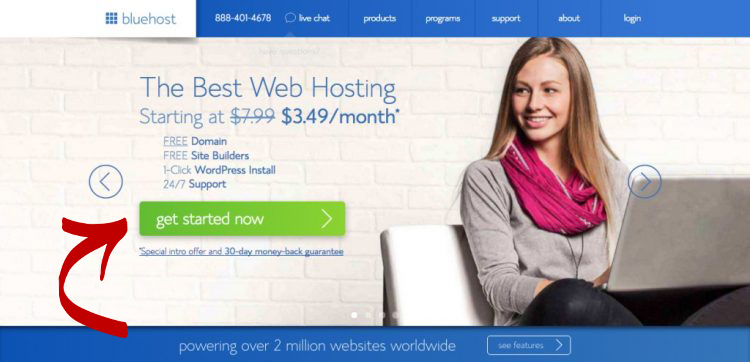
Go to Bluehost
First, Go to Bluehost (Discount added in the link) and click the “Get Started Now” button.
Select a Web Hosting Plan:
Then, It will ask you to choose the web hosting plan. BlueHost offers 3 plans here:
- Basic: (host one domain)
- Plus: (host multiple domains)
- Pro: (host multiple domains + Over $180/yr in extras)
I would say if you’re intending to host one domain only, then select the basic plan. It offers very good value. And as a newbie blogger, You won’t need the plus or pro packages until you grow your site and get more visitors.

Enter Your Domain Name:
Now that you’ve selected your web hosting plan, It will ask you to choose your desired domain name. There are two options listed here:
- New Domain: register a new domain name (Free Domain Included).
Or - I have a Domain Name: use your current domain name (If you’ve one already).
Don’t have a domain name? No worries, Bluehost offers a FREE domain name registration (Included with the web hosting plan). Just make sure to enter your desired domain in “New Domain“.
Have a domain name already and want to use it? Sure thing. Make sure to enter your current domain name in “I have a Domain Name“. Then, Bluehost will put it as your account’s primary domain name.

And click “Next“.
Enter Account Information:
Then it will ask you to choose your package information and add-ons.
If you’re just starting up and worried about the investment, I would strongly recommend that you go with the Basic 12 month in the beginning.
If you’re okay with the pre-investment, then it’s better to go with Basic 36 months to get a better discount rate and additional huge savings.
IMPORTANT TIP HERE: Also, I see that you don’t need any of Domain Privacy Protection, Site Backup Pro, or SiteLock Security at the beginning. I suggest that you start your blog as it is and upgrade your package as you grow your blog on the way.
So if you choose the Basic 12 month, and uncheck Domain Privacy Protection, Site Backup Pro, and SiteLock Security, your package will be for $65.45 with a free domain name.

Then “Scroll Down“.
Enter Billing Information:
Here, It will ask you to put in your payment information to finalize your order. If you prefer to pay using PayPal, click on “More payment options“.

After completing all the necessary information, click on “Submit”. You will be then taken to the Payment page whether it’s a credit card or a PayPal payment. After completing the payment, your Bluehost account will be activated automatically.
2. Point Domain To Web Hosting:
Note: If you’ve purchased your domain name from BlueHost along with your web hosting plan, you can simply skip this step and move forward to step 3. The following steps and guidance are valid only if you didn’t pick up a domain name from BlueHost.
Before going any further: If you’ve bought a domain name and web hosting from the same company, You can just skip this step. Both will be automatically synced together. Otherwise, We will need to get both connected as follows.
I strongly recommend getting the web hosting and domain name from different providers. This strategy will make your site more reliable and secure. It will make it hassle-free if you decided to migrate your site host somewhere else.
At this point, You will need to do the following:
- Copy Web Hosting Nameservers (from the welcome email).
- Login to the domain registrar’s panel.
- Edit domain nameservers.
- Save Changes.
My ultimate combination here is to buy a domain name from GoDaddy and get the hosting from BlueHost. In order to connect GoDaddy to Bluehost, You will need to login to your GoDaddy control panel with your username and password. And follow the following steps:
- Head to Domain Manager section.
- Choose The Domain you want to host on BlueHost
- Then, click “Launch“
Here, You will be able to see the following screen for your domain name manager tool:
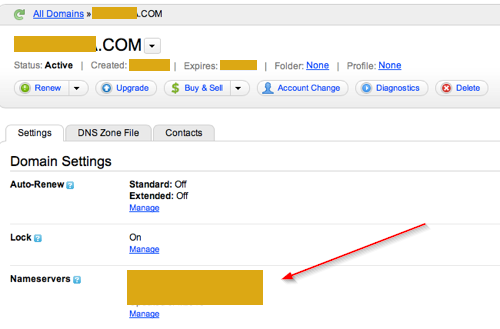
There, You will need to follow the steps below to host GoDaddy domain on BlueHost:
- Under “Nameservers Section”, Click Manage.
- Set “Nameservers Type” as Custom.
- Change them to point to BlueHost nameservers.
Now, What are the Bluehost nameservers?
The Default BlueHost DNS Nameservers Godaddy are as follows:
- NS1.Bluehost.com
- NS2.bluehost.com
After completion, The final screen should look like this:

Now that you’ve completed pointing BlueHost Nameservers to Godaddy, You will need to wait for up to a few hours in order for the changes to propagate globally. While waiting for it to be finished, you may spend the time installing WordPress or configuring the BlueHost free SSL certificate.
3. Install WordPress:

Now, We have got both web hosting and domain name synced together. It’s time to start building the website. Here, I would recommend using the WordPress content management system (CMS).
As a quick surprise; over 30% of the internet websites are using the WordPress platform! This makes it very positive that WordPress is a reliable software for your awesome website. WordPress comes with an easy to use control panel and interesting features to run a professional website.
Basically, WordPress allows you to add, edit, and manage your site content easily. And most importantly, You won’t need to write a single line of code. With a one-click installation process, You will be up and running with your new website in a few seconds!
WordPress has been frequently updated with the newly released programming code. This makes it a very secure platform to use for websites. You should not be technically advanced in order to use it and you’ll get it all ready with a click of a button.
- [5 Minute Tutorial]: Installing WordPress on Bluehost
- How To Build a Website on BlueHost (Step-by-Step)
After installing WordPress, it will be time to work on the website design. This design gives the website a soul and a character. WordPress is very rich when it comes to design options and layout. You can choose between thousands of free and premium WordPress themes.
If you’re into using a free WordPress theme to get started, you can do that right from your dashboard. On the control panel, go to “Appearance” and then “Themes”. In there, you will get hundreds of free WordPress themes that are ready to install with a click of a button.
While you still can use a free theme to get started, I strongly recommend that you count on a premium theme instead. Choosing a premium WordPress theme gives you lots of good features, better security, better SEO, and advanced support from the theme authors shall anything happened.
4. Tweaks & Configurations:

After installing WordPress, There are certain tweaks and configurations you need to do. This will help to optimize your site for performance and productivity. While the default WordPress settings are optimal, We still need to alter a few of them. These tweaks will give us a chance to get the most out of using WordPress CMS on our site.
Are you a freelancer? Building a website for your freelancing career gives you tons of options and credibility. This will set you up as a brand by yourself when it comes to your specialty. You can basically build a portfolio website showcasing your work to potential clients.
You may already use freelancing websites to get hired. And you may ask; why do I need a website while I’m already doing fine. My answer here is that you definitely need your own space on the internet. These platforms and other websites are great but are not yours!
Are you a businessman? Then, you certainly need web presence for your company. A website gives your business lots of credibility. Most potential customers don’t work with the business until they search their business name on search engines and social media platforms.
To make it more simple, you can create a one-page website telling the world about your business. You may also integrate email marketing software to collect email addresses from potential customers. You can send them offers and updates since they’re interested in your business.
That was quick explanations why you might need a website whether you’re a freelancer or a businessman. You may also work on integrating a blog and write insightful posts about your business to establish authority in your field. Focusing on SEO will get you in front of potential customers quickly.
5. Choosing a WordPress Theme:
It’s worth noting that the WordPress software has been widely supported by a large community. There are thousands of themes and plugins (free & paid) that can flip your site over and over again. Thanks to all the available assets, You can build an astonishing WordPress site in no time.
Whether your website is for business, personal, or simply a hobby blog, there are many themes and plugins to help you. Besides being a blogger, I’ve been a WordPress developer for years. And due to the fact that you might get overwhelmed on which tool to use. I’m here giving you my ultimate recommendations:
- Free Themes: WordPress Theme Directory and JustFreeThemes.
- Free Plugins: WordPress Plugin Directory.
However; I would recommend purchasing a premium WordPress theme if you’re serious about your website. Premium Themes will give you endless possibilities in terms of managing a professional site/blog.
Here are my recommendations on which premium theme to grab:
- MyThemeShop: Blazing Fast Loading WordPress Themes
- Elegant Themes Review: 87 WordPress Themes for $69
Most of the premium themes come with detailed documentation on how to install and configure the theme. All you need to do is to follow the steps. In a few minutes, You’ll be all set. But you may wonder; why to purchase a premium theme when you can get a free one!
Premium WordPress themes come with a lot of features and benefits for your website. Besides the direct support from the developer, you still get a decent value for the money. Furthermore, most of the premium themes offer free included access to additional premium plugins as well.
See why it is a brilliant choice to choose a premium WordPress theme over a free one:
High-Quality Edition with Better Design: WordPress themes seem to be built with the latest and evolving web standards in mind. The premium theme will make your website easily accessible and responsive to different devices. The premium themes are designed for any system or platform.
Help & Support Over The Clock: The free edition guarantees the consistency and transparency of a professional theme and design. The free themes are not packed up with free support from the authors, while the premium themes do. If you’ve some WordPress experience, use a free theme. But if you’re a complete newbie getting started, choose a premium one for the support and documentation on how to use it.
Frequent Code Updates: Keeping your website updated regularly is a standard aspect of a premium WordPress theme. On the other side, some of the free themes are not updated periodically. By choosing the free version, you won’t know when it’s updated, but you can be sure it’s going to stand as a time test with the Premium version.
6. Installing Necessary Plugins:
Also, There are important plugins that you need to install and configure. The following guides will walk you on 3 important plugins to setup. These plugins will get your site optimized for SEO, Speed, Performance, and Security. Here are the guides:
- How to Setup WordPress Yoast SEO Plugin (+Photos)
- The Absolute WordPress W3 Total Cache Settings (+Video)
- Best WordPress Login Security Plugins (Expert Pick)
Furthermore, Here is the complete list of plugins that will make your life easier:
- Akismet Anti-Spam.
- 301 Redirects.
- Jetpack by WordPress.com.
- No Self Pings.
- WordFence Security.
- Yoast SEO.
- W3 Total Cache.
- Google Analytics Dashboard for WP (GADWP).
I’ve been using these WordPress plugins on all the websites I’m working on; either for me or for clients. These plugins are all having free versions that are available for direct download on the WordPress repository.
6. Consider Getting a Logo:

This is a strong step to do if you’re after building a brand name. having a logo will strengthen your brand credibility. Don’t hold yourself back! Get a simple logo done at the beginning. Then, We can always enhance it later on.
You may use services like Fiverr to get a logo designed for you for as low as $5 USD. Also, you may like to use UpWork or Freelancer to find your logo designer. Also, 99Designs is another great alternative. It will allow you to run a contest and choose the best one from the submission.
Note: You still can go without a logo. That’s okay 🙂
7. Create a Custom Email (@yourdomain):
If you’re serious about your building a strong brand name, Then you MUST get a custom email address. It certainly increases the brand’s credibility. I have bought domain name now what. how do I get Email? Then, it’s time to create your custom email address.
You can create your custom email address within your hosting account (no additional charges). You will be able to create the email address (@yourdomain.com) and create a forwarder to your primary email.
If you’ve purchased hosting from BlueHost, then the following guide will be very useful. It will show details on how to use BlueHost WebMail and how to create and manage custom email addresses:
You will use your domain to build a personalized email address for your business. Using the regular free email addresses provided by Gmail, Yahoo, and others is indeed not as professional as having your own branded domain name @yourdomain.com.
Let’s say your name is Sam. Customers will trust you more if your email address sounds like sam@yourdomain.com. On the other side, having a generic email address like sam2352@gmail.com may sound a bit odd and will definitely affect your brand credibility.
Using professional email addresses for you and your employees is a must today. And the whole process starts with opting in for a decent web hosting and a domain name. Scroll up and see the steps on how to buy web hosting from BlueHost with a 57% discount.
A customized email can be useful in many ways. Let’s see below how emails can help you build a better brand:
Marketing: It is advisable for your organization to exchange emails with customers using your brandable email address. If your employees share their e-mail Addresses with others, you will know the name of your site, and your company will be advertised.
Professionalism: The name of the business gives the job a professional touch. Customers would consider you as more knowledgeable and take the work seriously as well. With a customized e-mail Address, workers always feel valued and allow them to become a part of the business.
Your username will be customized with a personalized e-mail address from your domain name. The likelihood of users getting difficulty generating a new email ID is less common. There might be several Sams in the world, but fewer than the same domain name in your business.
8. Add Content:

Content is the most important thing on your website. A website without content is exactly like a car without wheels. So you should start putting in content. It’s time to introduce some content to your business website.
Many marketers are saying that content is the king. Yes, It actually is. Sharing valuable content on your website and social channels give your potential customers an interesting idea about you and your business.
The more professional content you share, the more knowledgable your customers will think about you. It’s as simple as that! Besides, Content helps you get found online. When people are searching for particular terms, they may come by your business and start working with you!
Here are interesting reasons why WordPress is optimal for sharing content on your website;
Adding and editing pages: You can look “pages” on the sidebar in the WordPress dashboard. Click on “Add New” when you click pages. This allows you, once edited, to type content, add images, and save content as pages on your website.
Add Blog posts: You need to go to the sidebar and click on “Posts”. This is how we’re publishing blog posts on our blog, for example. Click “Add New” to add a new blog post to your website. Now your article can be written here. The blog is basically where you can publish news, updates, and posts section on your website.
The content will tell your visitors as well as search engines what your website is all about. Let me recommend a few important pages you need to add and create right away:
- About Me.
- Contact Me (Contact Form 7 plugin).
- Services Page.
- Products Page.
- Testimonial Page.
- Subscribe Page (How To Create Subscribe Form?)
- Privacy Policy.
- Terms of Service.
You just need to add relevant pages to your site. Furthermore, It will be a wise decision to have a blog on your business site. This will help to get traffic from search engines; like Google, Bing, and other search engines.
9. Setup Social Media Accounts:
Social media has become an excellent way to communicate with fans and potential customers. After getting your website up and running, You should create social media accounts using your unique brand name.
You’re not expected to use all platforms. My advice to you is to put your efforts into two or three platforms maximum. This way you can achieve better results by sharing content and interact with fans and potential customers.
Social media channels are the easiest ways to get found online. Make sure you are keen on your share and what you write about because this is basically your image online. Furthermore, The following guide will help you get noticed on the internet:
Also, Make sure to sign-up for social media accounts as soon as possible. This will give you a chance to reserve the exact website name on social media channels. Waiting for this step is not good at all since your brand name may be taken or not available to register on different social media channels.
10. Include Email Opt-in:

This is yet another crucial item on the list. Email Opt-in forms will help you building an growing a mailing list from day one. If there is one thing I regret, It would be not starting a mailing list right from the beginning of my website journey.
A mailing list will allow you to keep people engaged with your blog content. This basically means growing traffic to your website/blog. It’s definitely recommended to build an Email Opt-In form. There are many email marketing software you can use such as; MailerLite and MailChimp.
Here is another comprehensive guide on how to use the Email Marketing platform; MailChimp. I would recommend using the Bloom WordPress Plugin along with MailChimp.
11. Add eCommerce Store
A customized e-commerce website is accessible to you. This e-commerce website, as stated above and as it will be like your online store, is different from the standard website. You’re having to work with clients and selling products online.
These products could be downloadable, virtual, or even physical products. The idea of eCommerce websites is to have an active shop on the interest where shoppers can got check your products and buy them online.
In case you’re selling physical products, you can also manage inventory monitoring, order tracking, and payment collection using WordPress, and WooCommerce. Some functions must be included on the website to make it functional, functional, and trendy.
A good alternative to add an eCommerce facility to your website could be SamCart. It’s very easy to use, handy and could be integrated with your site with just one click. For more information, I recommend reading my article about WooCommerce vs SamCart to know which is better for you.
Simple to use:
The simplicity with which the online shop is used will be double-way. For you and the client, it should be simple. The client should be able to easily access your website’s features and products. Responsive, secure, and easy payment mechanism for the purchased goods. For you to use too, the website must be configured and readily accessible.
Payment mechanism built-in
Make sure you have an automated payment mechanism on your website. It sounds straightforward, but some website constructors do not provide the payment gateway. Offering a payment gateway on your website is ultimately an edge over competitors and you can simply use; PayPal or Stripe for that.
Through the automated payment mechanism, e-commerce businesses sacrifice the bulk of their customers as they move to another platform. This will help your online shop directly if this process is simple.
Management of inventory
The physical stock and online orders are often difficult to track. It is normal to collect electronic orders and you are unable to follow their specifications anymore. You can keep track of the stock on websites and link it with your website. There is one option.
You enter here the amount of stock you have at your disposal. By selling more and more items, you get a warning when the stock is small and when you run out of actual inventory, the product is immediately withdrawn from the platform.
Regulating Customer Relations
It is important that the customers are able to communicate with themselves and develop a personal profile via a CRM or customer relationship management. The consumer will store carts and save information for this specific profile.
The customer is expected to share their email ID during the creation of this account with you and later be able to inform the customer of businesses such as sales, discounts and other marketing events.
Safety SSL
In a business, safety should be the top priority. One way of gaining consumer confidence is through SSL or Safe Sockets Layer. As the customer shared his private information on the website, such as credit card numbers, it is important to ensure the site is secure. Here, SSL plays and maintains customer information intact.
It’s as simple to construct an online shop as writing a site. In just a few minutes, you can build it too easily.
12. Starting Personal Blog

If you’re not interested in starting a business online and still wonder “I’ve bought domain name now what? “To use it effectively, here is the only concept. You can definitely start a personal or a lifestyle blog and share your experiences and stories with the public.
To anyone on the internet, there are countless sites. People also want to share their insights, thoughts, and experiences with a global audience. How can I take this good path? How is a personal blog created?
Here are some reasons why starting a personal blog is really interesting:
- Add some personal information so that the readers get in touch with you in a personal way.
- Add links to your social media profiles or any other information of general contact such as an email address to allow visitors to contact you.
- Make sure you choose the best blog post format for a highly-readable and engaging blog.
The survey reveals that almost 77% of site users read blogs, so your audience is out there already. You can add all the information you think you need when you start writing a blog. Blogs will show how knowledgable and trust-worthy you and your business are.
13. Flipping Domains & Websites
If you don’t want to build a blog or do anything with the domain now, you can basically start flipping domain names and websites. If you’re asking; I’ve bought domain name now what? You can sell it. Many people find it difficult to find their own exclusive domain name.
Therefore, they can buy and save their time and energy from a pre-made domain. On domain aftermarket pages, you can contact interested buyers. Such places take the form of a fee for a small portion of your sale. You can sell your domain directly, or you can even auction it.
Find some tips to sell and buy your domain easily below:
In the purchasing of a domain to resell it is always essential to target a kind of industry. For instance, it is advisable to purchase a domain for cake and pastry if you have an excellent knowledge of baking.
You can have a sense of price-setting since you know that baking ingredients are usually costly. You can not even know the industry, specialist businesses and consumers can’t seriously take your services. The public and the flow in the market must be understood.
It is vital that you find real value names. The way you think about titles as a customer is an excellent starting point. Now that we know you ‘d enter a category, you will soon start considering the need for a brand name that represents the reach of your competitors. Questions like how competitive the market, sales volume, and return rate are.
You want to build and sell a domain for a baker, for example, and you know that the wedding season is approaching. We can then assume that sales are flourishing. We shall now look at the naming of their domain by other cake vendors. Is that easy, like ‘velevetfrosting.com’ or something fancy?
We will now see how many consumers can actually understand the domain and purchase something. These two steps will help you to value your domain and to know your market well. Now, people should bid for your product more after such hard work.
Bought Domain Name Now What?
That was it all to build a professional website. It’s always easy to get started but a bit harder to keep everything maintained and up to date. So my suggestion is to focus on increasing site traffic. A great idea is to build a mailing list. This will help you build a growing audience.
- New To Blogging? Avoid These Fatal Blogging Mistakes
- Why Most Bloggers Fail & How To Make Money?
- What I Wish I Knew Before Starting My Blog
I have bought a domain name now what? All you need to do is to follow the above steps to get started. I made sure to be as detailed and specified as possible. This guide should be great for absolute beginners. So feel free to share this article with those who may find it useful too.
Have you already started a website or a blog? Please share your experiences with it. Also, let me know in the comments below what was the biggest challenges along the way. I would love to help!
There were some enjoyable and cost-efficient ways to use the domain name. You will use the domain of infinite possibilities. Make sure you do what makes you more successful and what you enjoy.
I hope that our burning question answered successfully, “Now what have I purchased a domain? ”. Let me know by leaving a note below whether you have any such creational uses of domain names. And yes, if you find it useful to you, do not hesitate to share.

Hi,Thanks for the wonderful and very informative article.I have bought the domain from big rock and hosting package from hosting Raja…
Now our plan is to replicate the parent companys(international)website and create a website for the regional company with slight change in the name,logo and address.The content of the website is mostly same as that of the parent company. We have all the necessary approvals from the parent company.
Please advise how to do it.
Nice work done. It is helpful.
Man, you’ve done such a great job through this page. After purchasing a domain, I couldn’t have gone any better place… thanks indeed!